UILayoutGuide: Auto Layout Helper View
November 7, 2015
In this article, I will explain how to replace the dummy views, added in our UI, just for the sake of adjusting layout, with a much more light element. We been using dummy view in our UI for long time to ease the pain of Auto Layout complexity. Apple introduced a new technique in iOS 9 to replace those dummy views with a much more lightweight element called UILayoutGuide.
UILayoutGuide, as per the Apple documentation,
The UILayoutGuide class defines a rectangular area that can interact with Auto Layout.
sounds like a UIView, isn’t it. Just for a sake of understanding, we can think of it as UIView but it will not appear on the screen and it wont respond to user touches, just dummy.
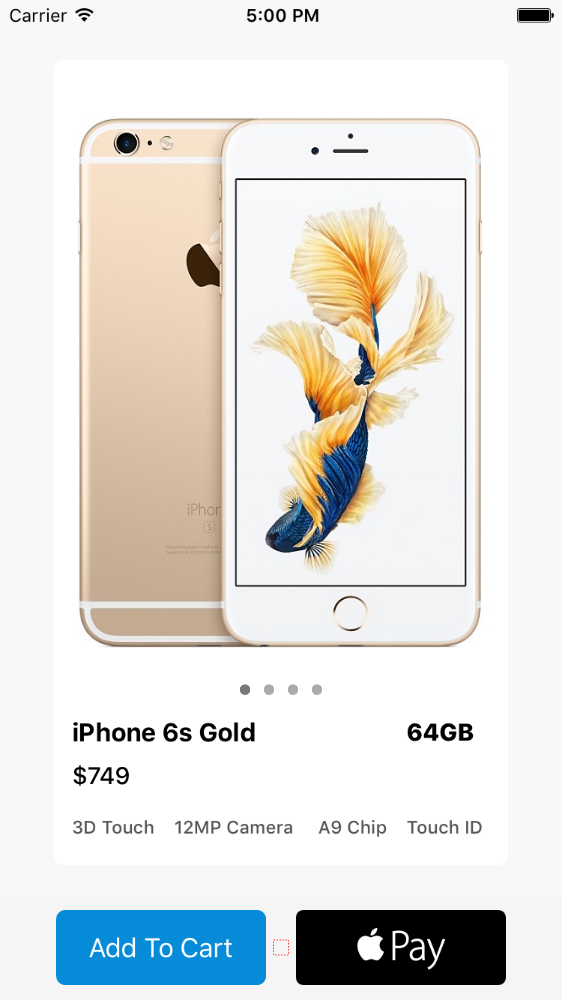
Let me give you an example, have you ever wanted a layout which contains two controls horizontally aligned centrally and with a fixed space, like the footer view in the below screen.

Check out the footer view on this example screen, Add To Cart and Pay buttons are centrally aligned with a fixed space between each other. To achieve this layout there are different methods, one of the famous and commonly used method is, introducing a new separator view, UIView, in between those two buttons, like this

- Add a dummy UIView
- Add horizontal + vertical center constraints to the dummy view
- Add any fixed width and height constraints to the dummy view
- Add horizontal spacing constraint between the Add To Cart Button and dummy view
- Finally add horizontal spacing constraint between the Pay button and the dummy view

This should work fine in all the devices.
It works fine, What is the problem then?
Of course it works fine, but what we did was a simple UI hack. Then what is the proper solution? Honestly i don't know.
And Apple said, Let there be a replacement for dummy view and there was a replacement. And Apple called the replacement UILayoutGuide. And there was an iOS 9 and there was a new feature.
UILayoutGuide is a proper solution to solve this issue. But unfortunately Apple forgot to include the UILayoutGuide in Interface Builder.

Yes, we can only create UILayoutGuide programmatically.
let layoutGuide = UILayoutGuide()
self.view.addLayoutGuide(layoutGuide)
Note:
1. UILayoutGuide is a dummy rectangular area in you view
2. It will not respond to user touch
3. It will not appear on the screen
4. It is lightweight compare to UIView
You can create as many guides as you want, just like view and controls.
Create views and layout guide
// Separator Layout Guid
let checkoutButtonSeparatorGuide = UILayoutGuide()
footerView?.addLayoutGuide(checkoutButtonSeparatorGuide)
// Checkout Button
let checkoutButton: UIButton = UIButton(type: .System)
checkoutButton.translatesAutoresizingMaskIntoConstraints = false
checkoutButton.backgroundColor = UIColor.greenColor()
checkoutButton.setTitle(“Checkout”, forState: .Normal)
footerView?.addSubview(checkoutButton)
// Apple Pay Button
let applePayButton: UIButton = UIButton(type: .System)
applePayButton.translatesAutoresizingMaskIntoConstraints = false
applePayButton.backgroundColor = UIColor.greenColor()
applePayButton.setTitle(“Pay”, forState: .Normal)
footerView?.addSubview(applePayButton)
Add Constraints
var constraints = [NSLayoutConstraint]()

// Separator Guide Constraints
constraints.append(checkoutButtonSeparatorGuide.centerXAnchor.constraintEqualToAnchor(footerView?.centerXAnchor))

constraints.append(checkoutButtonSeparatorGuide.centerYAnchor.constraintEqualToAnchor(footerView?.centerYAnchor))

constraints.append(checkoutButtonSeparatorGuide.widthAnchor.constraintEqualToConstant(20))

constraints.append(checkoutButtonSeparatorGuide.heightAnchor.constraintEqualToConstant(20))

// Checkout Button Constraints
constraints.append(checkoutButton.rightAnchor.constraintEqualToAnchor(checkoutButtonSeparatorGuide.leftAnchor, constant: -10))

constraints.append(checkoutButton.centerYAnchor.constraintEqualToAnchor(checkoutButtonSeparatorGuide.centerYAnchor))

constraints.append(checkoutButton.widthAnchor.constraintEqualToConstant(124))

constraints.append(checkoutButton.heightAnchor.constraintEqualToConstant(36))


// ApplePay Button Constraints
constraints.append(applePayButton.leftAnchor.constraintEqualToAnchor(checkoutButtonSeparatorGuide.rightAnchor, constant: 10))

constraints.append(applePayButton.centerYAnchor.constraintEqualToAnchor(checkoutButtonSeparatorGuide.centerYAnchor))

constraints.append(applePayButton.widthAnchor.constraintEqualToConstant(124))

constraints.append(applePayButton.heightAnchor.constraintEqualToConstant(36))

NSLayoutConstraint.activateConstraints(constraints)
Build and run the code, your app should layout your view something like this,

Simple isn’t it?
You can use layout guides in different scenarios, like the above, to build your complex UI without adding any heavy-weight UIViews.
I have included an example project in github you can check it out.
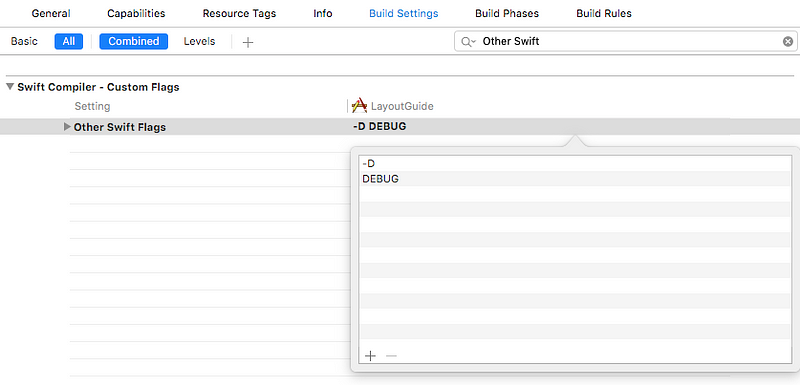
One More Thing… Debugging!
Since layout guide wont display in the screen, how to debug it?
Add -D DEBUG flag in your Other Swift Flags in your Build Settings of your target.
I have created UIView+LayoutGuideDebug utility. Just add this file into your project and add the below lines in you View/ViewController.
override func viewDidLayoutSubviews() {
   super.viewDidLayoutSubviews()

   self.view.showLayoutGuides()
}
Build and Run the code, now you can see dotted rectangles between your views like the footer view in the below screen.
We will hope that Apple will add layout guide in Interface Builder in upcoming XCode.